In this post, we will see how to install MySQL server on AWS EC2 Amazon Linux 2 and configure the security group to access from your desktop
The Amazon Linux AMI is a supported and maintained Linux image provided by Amazon Web Services for use on Amazon Elastic Compute Cloud (Amazon EC2). It is designed to provide a stable, secure, and high-performance execution environment for applications running on Amazon EC2. It supports the latest EC2 instance type features and includes packages that enable easy integration with AWS. Amazon Web Services provides ongoing security and maintenance updates to all instances running the Amazon Linux AMI. The Amazon Linux AMI is provided at no additional charge to Amazon EC2 users.
Steps to Create Amazon Linux Instance
- Launch a new AWS EC2 Instance Wizard
- Choose with Amazon Linux 2 AMI x64
- Select t2.micro which is free tire eligible
- Configure the VPC, Network etc ( I go with default )
- Choose Storage, I choose 8 GiB Magnetic Standard
- Add Tags if required
- Then create the security group to allow port 22 ( SSH / SFTP ) and 3306 (MySQL Default port)
- Choose the pem file and click Launch


Install MySQL on Amazon Linux 2
Once the Instance is launched wait for the initialization to complete
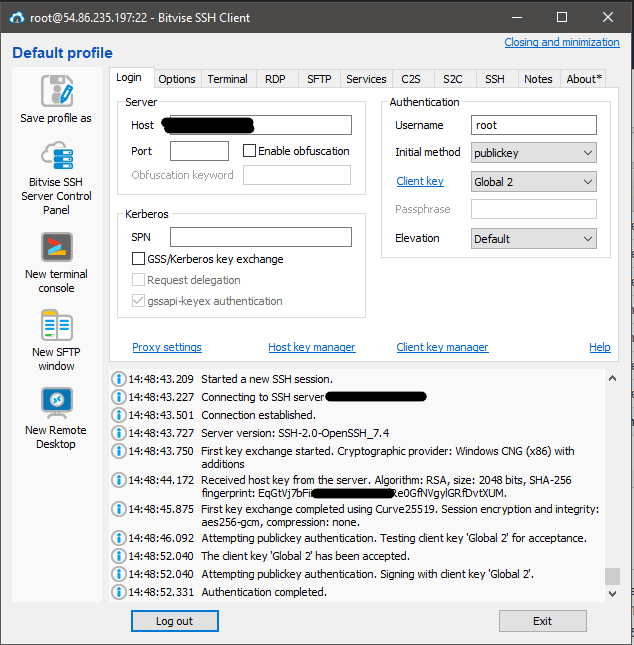
SSH into the newly created machine with the pem key ( I am using Bitvise SSH client from my windows )
Do the yum update
Installed:
  kernel.x86_64 0:4.14.138-114.102.amzn2

Dependency Installed:
  json-c.x86_64 0:0.11-4.amzn2.0.3

Updated:
  amazon-linux-extras.noarch 0:1.6.9-1.amzn2                                      amazon-linux-extras-yum-plugin.noarch 0:1.6.9-1.amzn2
  amazon-ssm-agent.x86_64 0:2.3.662.0-1.amzn2                                     curl.x86_64 0:7.61.1-11.amzn2.0.2
  ec2-hibinit-agent.noarch 0:1.0.0-4.amzn2                                        ec2-instance-connect.noarch 0:1.1-10.amzn2
  libcurl.x86_64 0:7.61.1-11.amzn2.0.2                                            libssh2.x86_64 0:1.4.3-12.amzn2.2.1
  nss-softokn.x86_64 0:3.36.0-5.amzn2.0.1                                         nss-softokn-freebl.x86_64 0:3.36.0-5.amzn2.0.1
  systemtap-runtime.x86_64 0:4.1-0.20190208git4e76869512d2.amzn2.0.2

Complete!
sudo wget https://dev.mysql.com/get/mysql57-community-release-el7-11.noarch.rpm
sudo yum localinstall mysql57-community-release-el7-11.noarch.rpm
sudo yum install mysql-community-server
sudo systemctl start mysqld.service=====================================================================================================================================================
Package Arch Version Repository Size
=====================================================================================================================================================
Installing:
mysql-community-libs x86_64 5.7.27-1.el7 mysql57-community 2.2 M
replacing mariadb-libs.x86_64 1:5.5.62-1.amzn2.0.1
mysql-community-libs-compat x86_64 5.7.27-1.el7 mysql57-community 2.0 M
replacing mariadb-libs.x86_64 1:5.5.62-1.amzn2.0.1
mysql-community-server x86_64 5.7.27-1.el7 mysql57-community 165 M
Installing for dependencies:
mysql-community-client x86_64 5.7.27-1.el7 mysql57-community 24 M
mysql-community-common x86_64 5.7.27-1.el7 mysql57-community 275 k
ncurses-compat-libs x86_64 6.0-8.20170212.amzn2.1.2 amzn2-core 314 k
Transaction Summary
=====================================================================================================================================================
Install 3 Packages (+3 Dependent packages)To get the default password
sudo grep 'temporary password' /var/log/mysqld.log
2019-08-31T09:30:06.527923Z 1 [Note] A temporary password is generated for root@localhost: 0+,orlwf3ra
Change the password
mysql_secure_installation
Remove anonymous users? (Press y|Y for Yes, any other key for No) : y
Success.


Normally, root should only be allowed to connect from
'localhost'. This ensures that someone cannot guess at
the root password from the network.

Disallow root login remotely? (Press y|Y for Yes, any other key for No) : n

 ... skipping.
By default, MySQL comes with a database named 'test' that
anyone can access. This is also intended only for testing,
and should be removed before moving into a production
environment.


Remove test database and access to it? (Press y|Y for Yes, any other key for No) : y
 - Dropping test database...
Success.

 - Removing privileges on test database...
Success.

Reloading the privilege tables will ensure that all changes
made so far will take effect immediately.

Reload privilege tables now? (Press y|Y for Yes, any other key for No) : y
Success.

All done!
Create user and grant remote access
Add a new line in my.cnf file
 vi /etc/my.cnf
bind-address=YOUR-SERVER-IP
Restart service
systemctl restart mysqlThen connect to MySQL and create user and grand all privilege to all database
[ec2-user@ip- etc]$ mysql -u root -p
Enter password:
mysql> GRANT ALL ON *.* TO vignesh@'%' IDENTIFIED BY "Vignesh@123";
Query OK, 0 rows affected, 1 warning (0.00 sec)
mysql> FLUSH PRIVILEGES;
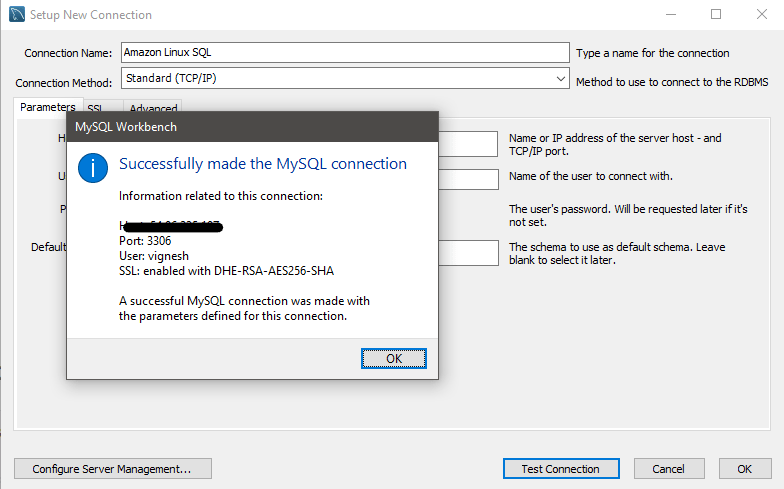
Query OK, 0 rows affected (0.00 sec)Connect to MySQL using MySQL Workbench
Connect to Database with user vignesh and password Vignesh and the Host as Amazon Linux IP
Also published on Medium.