In this post, we will see how to install ZFS on Ubuntu and present a ZVOL through iSCSI protocol to a Windows Machine for SQL Database
First I created a Linux Ubuntu x64 Virtual Machine and installed the Ubuntu 18.04 Server using the server iso file available in the Ubuntu website
After installing the Ubuntu, configured the static IP and installed openssh-server
sudo apt-get install openssh-serverThen I proceed to install the ZFS File system in my mint ubuntu
Install Software properties common
sudo apt-get install software-properties-common
First, you have to make sure that main, restricted, universe and multiverse software sources of the official Ubuntu package repository are enabled.
vignesh@vigneshzfs:~$ sudo apt-add-repository main
'main' distribution component is already enabled for all sources.
vignesh@vigneshzfs:~$ sudo apt-add-repository main
'main' distribution component is already enabled for all sources.
vignesh@vigneshzfs:~$  sudo apt-add-repository universe
'universe' distribution component is already enabled for all sources.
vignesh@vigneshzfs:~$ sudo apt-add-repository multiverse
'multiverse' distribution component is already enabled for all sources.
Install ZFS
vignesh@vigneshzfs:~$ sudo apt-get install zfsutils-linux
Reading package lists... Done
Building dependency tree
Reading state information... Done
The following additional packages will be installed:
  libnvpair1linux libuutil1linux libzfs2linux libzpool2linux zfs-zed
Suggested packages:
  nfs-kernel-server samba-common-bin zfs-initramfs | zfs-dracut
The following NEW packages will be installed:
  libnvpair1linux libuutil1linux libzfs2linux libzpool2linux zfs-zed zfsutils-linux
0 upgraded, 6 newly installed, 0 to remove and 186 not upgraded.
Need to get 1,106 kB of archives.
After this operation, 4,236 kB of additional disk space will be used.
Do you want to continue? [Y/n] Y
Now ZFS is successfully installed on my Ubuntu 18.04 virtual machine
Next step, I added a couple of 16G disks to my ZFS virtual machine for setting up ZPOOL with RAID 0
RAID 0 has its own advantage and disadvantage, raid0 or striping array has no redundancy, but provides the best performance and additional storage. Any drive failure destroys the entire array so raid 0 is not safe at all. if you need really fast scratch space then raid0 does well.
You can read more about the RAID and the advantage of each RAID types in this blog post
After adding Virtual Disk to my virtual machine I did rescan-scsi-bus
root@vigneshzfs:/home/vignesh# rescan-scsi-bus
/sbin/rescan-scsi-bus: line 592: [: 1.57: integer expression expected
Host adapter 0 (ata_piix) found.
Host adapter 1 (ata_piix) found.
Host adapter 2 (mptspi) found.
Scanning SCSI subsystem for new devices
Scanning host 0 for  SCSI target IDs  0 1 2 3 4 5 6 7, all LUNs
Scanning for device 0 0 0 0 ...
OLD: Host: scsi0 Channel: 00 Id: 00 Lun: 00
      Vendor: NECVMWar Model: VMware IDE CDR00 Rev: 1.00
      Type:   CD-ROM                           ANSI SCSI revision: 05
Scanning host 1 for  SCSI target IDs  0 1 2 3 4 5 6 7, all LUNs
Scanning host 2 for  SCSI target IDs  0 1 2 3 4 5 6 7, all LUNs
Scanning for device 2 0 0 0 ...
OLD: Host: scsi2 Channel: 00 Id: 00 Lun: 00
      Vendor: VMware   Model: Virtual disk     Rev: 2.0
      Type:   Direct-Access                    ANSI SCSI revision: 06
Scanning for device 2 0 1 0 ...
NEW: Host: scsi2 Channel: 00 Id: 01 Lun: 00
      Vendor: VMware   Model: Virtual disk     Rev: 2.0
      Type:   Direct-Access                    ANSI SCSI revision: 06
Scanning for device 2 0 2 0 ...
NEW: Host: scsi2 Channel: 00 Id: 02 Lun: 00
      Vendor: VMware   Model: Virtual disk     Rev: 2.0
      Type:   Direct-Access                    ANSI SCSI revision: 06
2 new device(s) found.
0 device(s) removed.
It detected both of my disks successfully
Now creating a ZPOOL using zpool create with both the disk sdb and sdc
root@vigneshzfs:/home/vignesh# zpool create sql-pool /dev/sdb /dev/sdcroot@vigneshzfs:/home/vignesh# zpool list
NAME SIZE ALLOC FREE EXPANDSZ FRAG CAP DEDUP HEALTH ALTROOT
sql-pool 31.8G 273K 31.7G - 0% 0% 1.00x ONLINE -
root@vigneshzfs:/home/vignesh# After creating the ZPOOL, create ZFS
root@vigneshzfs:/dev# zfs list
NAME       USED  AVAIL  REFER  MOUNTPOINT
sql-pool  82.5K  30.8G    24K  /sql-pool
root@vigneshzfs:/dev# zpool status
  pool: sql-pool
 state: ONLINE
  scan: none requested
config:

        NAME        STATE     READ WRITE CKSUM
        sql-pool    ONLINE       0     0     0
          sdb       ONLINE       0     0     0
          sdc       ONLINE       0     0     0

errors: No known data errors
root@vigneshzfs:/dev# zfs create  -o compression=off -o dedup=off -o volblocksize=32K -V 10G sql-pool/disk1
root@vigneshzfs:/dev# zfs list
NAME             USED  AVAIL  REFER  MOUNTPOINT
sql-pool        10.1G  20.7G    24K  /sql-pool
sql-pool/disk1  10.1G  30.8G    12K  -
root@vigneshzfs:/dev# sudo zfs set sync=disabled sql-pool/disk1
Next Part is installing iSCSI target
root@vigneshzfs:/home/vignesh# apt -y install tgt
Reading package lists... Done
Building dependency tree
Reading state information... Done
The following additional packages will be installed:
  ibverbs-providers libaio1 libconfig-general-perl libibverbs1 libnl-route-3-200 librdmacm1
Suggested packages:
  tgt-rbd
The following NEW packages will be installed:
  ibverbs-providers libaio1 libconfig-general-perl libibverbs1 libnl-route-3-200 librdmacm1 tgt
0 upgraded, 7 newly installed, 0 to remove and 186 not upgraded.
Then check the device path
root@vigneshzfs:/dev# ll /dev/zvol/sql-pool/disk1
lrwxrwxrwx 1 root root 9 Aug 15 13:18 /dev/zvol/sql-pool/disk1 -> ../../zd0
After installing the tgt need to create a new config file under /etc/tgt/conf.d/
root@vigneshzfs:/home/vignesh# nano /etc/tgt/conf.d/sql-target.conf<target iqn.2019-08.asvignesh.in:sqlpool1>
# Provided device as an iSCSI target
backing-store /dev/zvol/sql-pool/disk1
</target>The first line begins the particular iSCSI LUN configuration. In this case, the LUN labeled ‘iqn.2019-08.asvignesh.in:sqlpool1‘.
The ‘iqn‘ part indicates that this will be an iSCSI qualified name. The ‘2019-08‘ is an arbitrarily chosen date combination. ‘asvignesh.in‘ is the domain that this particular LUN belongs.
Finally, the ‘ sqlpool1 ‘ is used as the name for this particular target.
Next line is where the actual storage space that will be used by the initiator exists. In this case, the storage backing will be the logical volume that was created earlier in the guide.
The final line is the closing statement for the target definition. Pay attention to the closing slash in front of the keyword target!
root@vigneshzfs:/dev# service tgt restart
root@vigneshzfs:/dev# tgtadm --mode target --op show
Target 1: iqn.2019-08.asvignesh.in:sqlpool1
    System information:
        Driver: iscsi
        State: ready
    I_T nexus information:
    LUN information:
        LUN: 0
            Type: controller
            SCSI ID: IET     00010000
            SCSI SN: beaf10
            Size: 0 MB, Block size: 1
            Online: Yes
            Removable media: No
            Prevent removal: No
            Readonly: No
            SWP: No
            Thin-provisioning: No
            Backing store type: null
            Backing store path: None
            Backing store flags:
        LUN: 1
            Type: disk
            SCSI ID: IET     00010001
            SCSI SN: beaf11
            Size: 10737 MB, Block size: 512
            Online: Yes
            Removable media: No
            Prevent removal: No
            Readonly: No
            SWP: No
            Thin-provisioning: No
            Backing store type: rdwr
            Backing store path: /dev/zvol/sql-pool/disk1
            Backing store flags:
    Account information:
    ACL information:
        ALL
root@vigneshzfs:/dev#
Now all the server-side setup is completed, now let us try to connect the device to the windows machine
In windows, Open iSCSI initiator, add the IP of the ZFS machine and connect
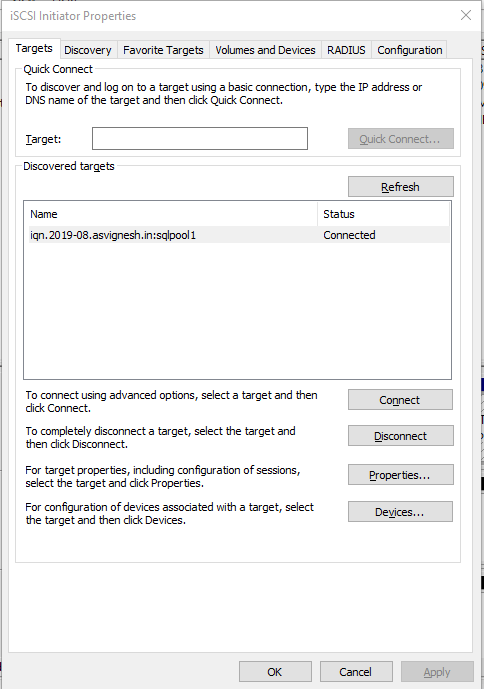
Then go to the Disk management and add the disk format with NTFS
Yola!!!
Also published on Medium.